Sunday, November 10, 2013

DIY Pallet Frames

 
Step one rip apart a pallet. This is by far the hardest part of this project!
 I made 3 frames,17 x 18. I needed 1 1/2 pallets.
 After getting the wood free it was time to cut. I was planning on using 8 x 10 pictures over top of these frames and liked the look of 17 x18, you can adjust the size to whatever you prefer. I would suggest when choosing the length to go by slats of wood that way you only have to make one small cut . I liked the look of 6 slats for the length and 18 inches for the width. 
 
For this project my Man taught me to use the chop saw.... scary... but after the first cut it was cake. My pallet gave me slats that were 36 inches long by cutting it in half I was able to use both pieces for frames.
 I laid them out and then used some trimmed down pallet wood to hold it all together. This doesn't have to look nice since it is the back.
 Apply a generous amount of wood glue.
 and nail those suckers in place. Look at me using power tools. My mister has a pretty good collection and is really kind to share (and teach me how).
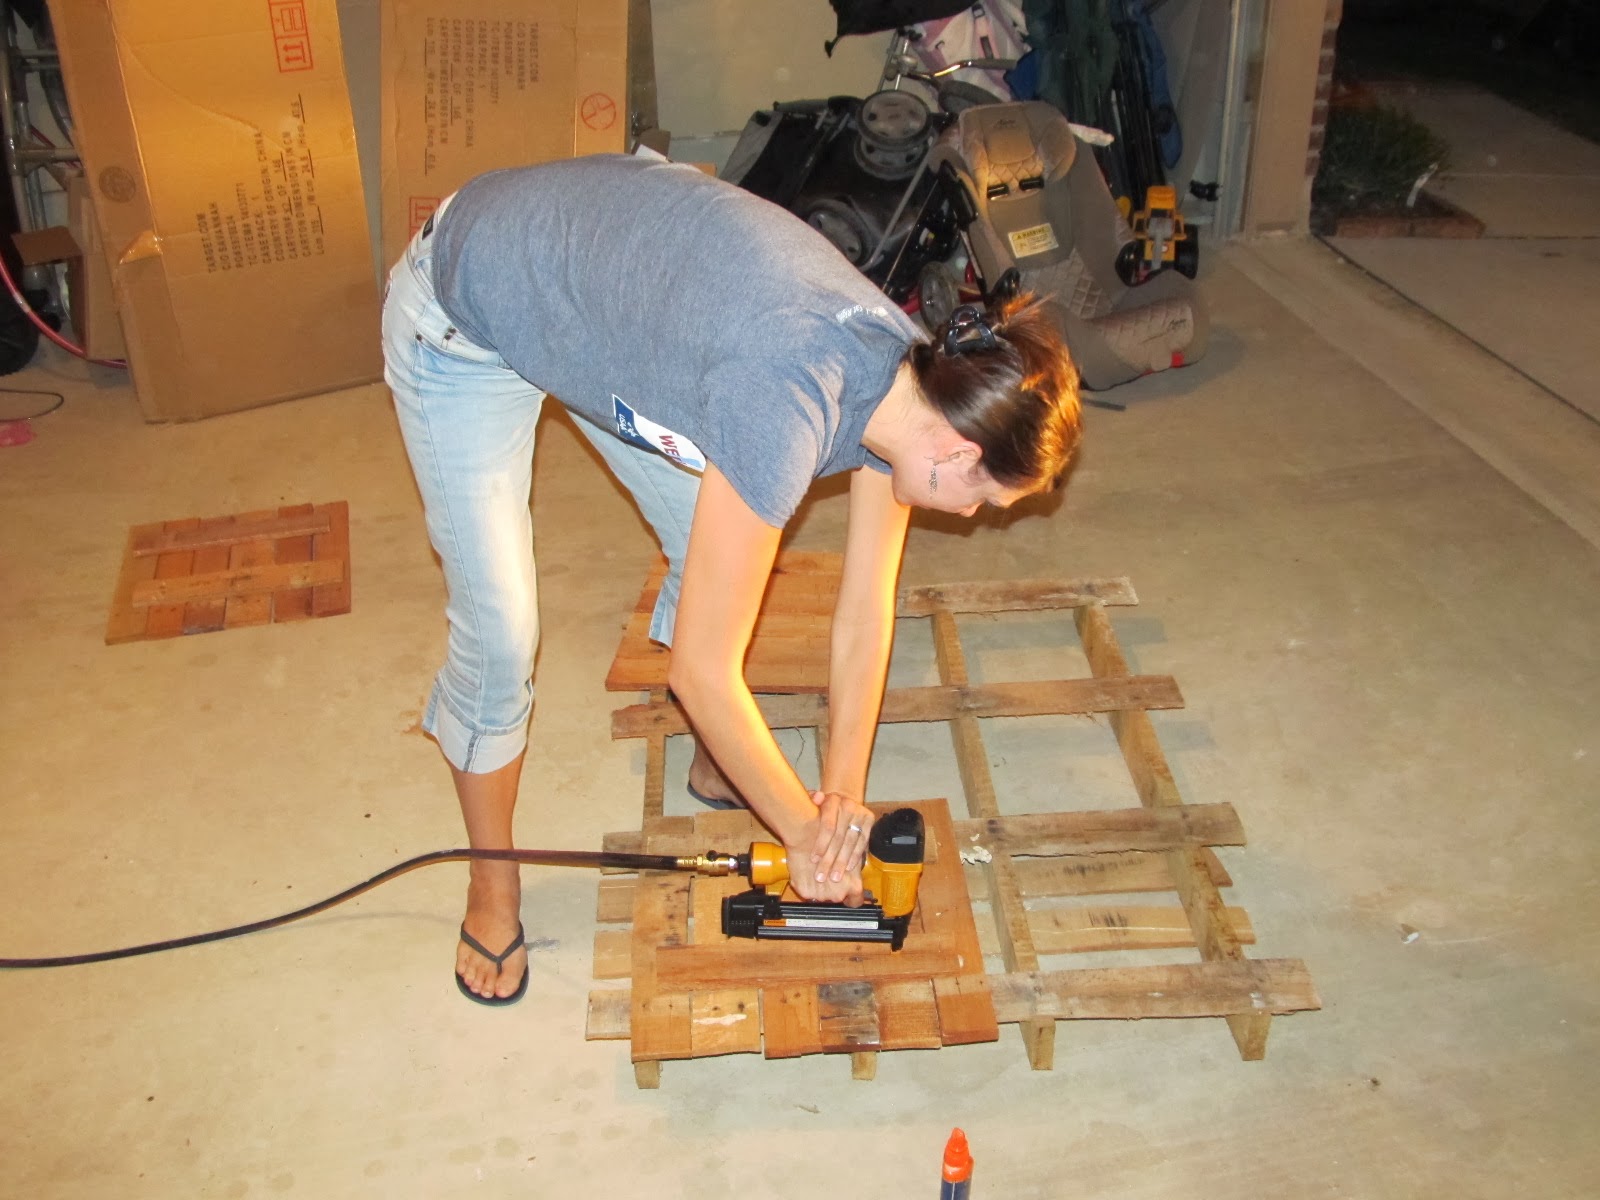
 If you don't have a nail gun, the trusty  hammer will get the job done.
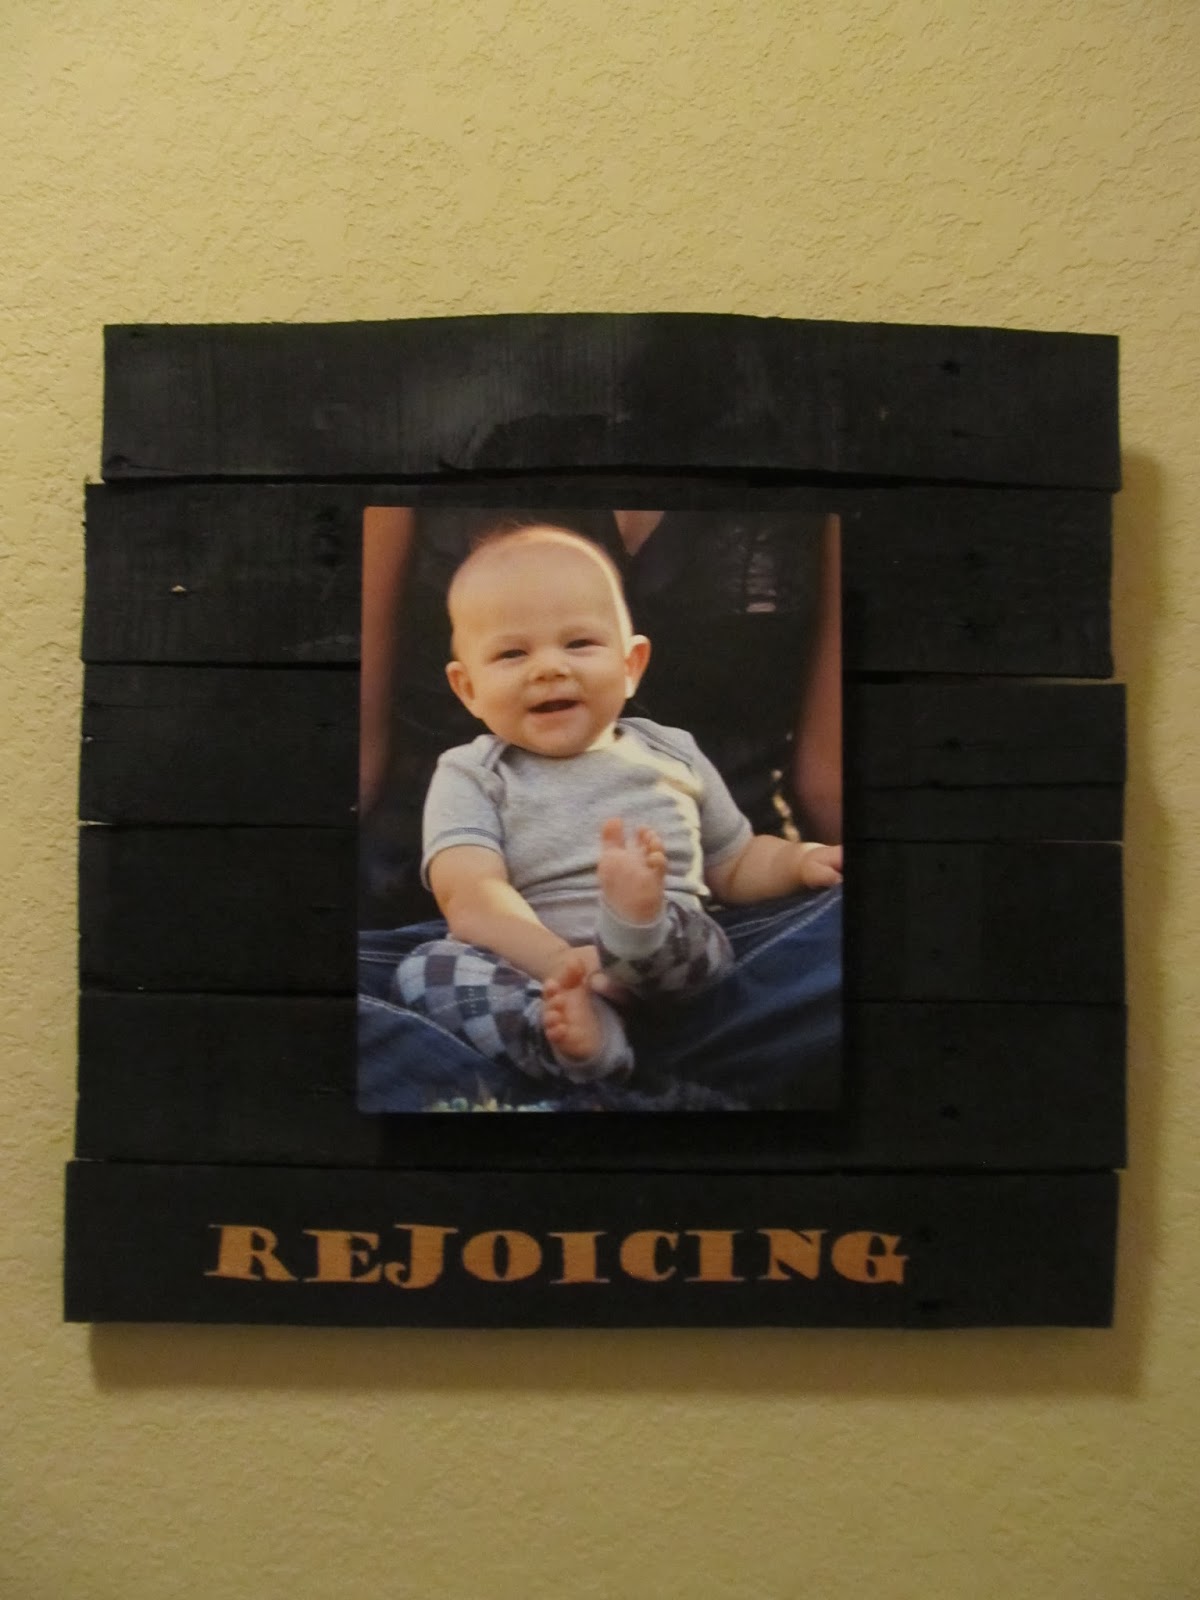
I added some contact paper cut from my fancy new sillouette (happy early birthday to me!)
 
 
Spray paint away! Once the paint is dry peel off the contact paper and marvel a moment--it looks so cool!


 with some wire laying around the garage... you know you have some and a few screws, they were ready to be hung.
 I found a groupon for a picture printed onto metal for $5 and knew they would be perfect of this project but a canvas would work or even a regular print with some modge podge .

Here's the finished product:


Monday, October 7, 2013

DIY Scrabble Frame

 I have a lot of empty walls in this house. I came across this idea on you guessed it.... Pinterest and set out looking for old Scrabble games. I did find a few listed on craigslist but for some reason or another, craigslist failed me this time--which like never happens--I know that craigslist is true..... In the end I purchased the boards off of etsy, 3 for $7.50.

  I had the tiles already from an old picked apart game, so next up was coming up with the words to describe my little guys. This was has the hardest part... not coming up with words but actually having the tiles with the right letters, and I was reminded how bad I am at Scrabble. After we decided on the words and the arrangement of them it was time to place the pictures. I had some frames that I traced with pencil on this one. The second I got more daring and just measured with the ruler for the size I wanted the pictures to be.

  I used a straight edge to guide my razor and started cutting away. After the initial cut I abandoned the straight edge and let the grove in the board guide me. My razor was pretty dull and it took 4-5 cuts to get through the board.


 I hot glued the letters in place, and taped the pictures on the back.


Sunday, September 29, 2013

Cowboy Nursery-- Pallet shelf


 First thing is to scrounge yourself a pallet. I happen to live in a construction zone and see a few palettes lying around every time I leave the house. All palettes are not created equal. This palette is in excellent condition and the better shape it's in the easier it will be to rip apart.
Okay a typical pallet has a bottom and a top. The bottom has just a few slats of wood and the top has quite a few in order to hold whatever it was used to hold. I know, I know I am so technical. Flip the palette over so the top is face down. It should look similar to this. There should be around 4 slats of wood on this side.
Grab your hammer or pry bar and gently start removing the two slats of wood in the middle of the pallet. I say gently, but this is serious work. These things are meant to be sturdy. The goal is to remove the wood without it cracking and breaking because we will be re-positioning the wood  to transform this into a shelf. 
Now your pallet looks like this and you are probably pretty sweaty--well if you live in Texas and doing this in your garage you most definitely are!
This is what the end of your pallet looks like.
This is what the bottom of your shelf looks like! You removed at least two planks of wood; nail or screw one plank of wood to each end of the pallet. The wood won't need to be cut, just attached.

Now you will need to decide the size of your shelves. You can cut the palette directly in half and have two of the same size. For Mac's nursery we cut 3/4 and 1/4 so they would be varying sizes. Once you cut the pallet into two pieces all you will need to do is paint or stain. I am kinda terrified of saws and had the hubs do it for me. He used a skill saw and made three cuts total, took him 5 minutes or less.  Just cut the vertical pieces of wood between the slats running horizontally and viola you have 2 rustic pallet shelves! 

We stained our shelves and didn't take much care in it. We were going for a rustic uneven look.

Wednesday, September 18, 2013

Cowboy Nursery-- Cowboy Silhouette and Fence


I love how this paint job turned out. I really love that it only took me a few hours and I could do a little bit and go put my very swollen feet up for awhile without having to disrupt the whole process. We discussed multiple options for the fence from barbed wire to picket, but after looking at scores of clip art sites finally decided on this one: clip art
In all honesty I was hoping for a vinyl decal to slap up and be done but once I discovered there weren't any on the market that were up to my standards or in my price range, I manned up and committed to drawing this free hand.  I used a yard stick as my straight edge and drew straight on the wall with a mechanical pencil. I wanted this to look rustic, I didn't worry about it being uniform. The lines didn't have to be straight, or the planks identical. I followed the clipart as a general guide and just went for it. 
Once it was drawn on the wall, I went ahead and taped off the baseboards and got started painting. I tried using a foam brush but with the texture on the wall I quickly changed to a small bristle brush to make sharp edges.

I knew I wanted this sleepy cowboy as soon as I decided on the Cowboy theme. I grew up seeing these cowboy silhouettes cut out of wood leaning up against trees and houses but buying one was pricey and making one was out of my realm of DIY expertise. So I thought I would just free hand it too... until I found this pattern at amazon.com: sleeping cowboy pattern.
and it was like seven dollars, all I had to do was cut out the paper pattern and tape it to the wall and trace away! Once he was outlined on the wall, it took maybe 2 more hours to paint him. 

The painting in this room had the greatest pay off for me. It was an easy task and completely set the tone for my  Mac's Western Oasis.

Cowboy Nursery for around $50

It's time, my baby is turning 4 months and at our house that means moving into the nursery. I really would prefer to find the pause button and keep him tiny forever, at least a little longer.  At the very least I get to spend more time in his Texas themed nursery, in honor of my sweetie boy growing up way too fast and leaving me for the first time. Here it is for y'all to enjoy:

It was soooo fun decorating McCoy's Nursery. We had all the big stuff so we could focus on the fun stuff. We really got our craft on and I think it worked out awesome.  Wade helped a ton and like always impressed me with his handy man skills.
 
 That lasso says "McCoy" just in case you can't read the messy cursive. This project was way harder than expected and not as perfect as I would like, but when compared to the $50 price tag to have one custom made it was worth it. Cost me $5 dollars for 100 feet of rope and some Elmer's glue.
 Wade made the shelves from a pallet we rummaged from the construction zone we live in. $6 for a can of stain with lots left over for future projects!
 Wade made the Texas flag from some 2x4's courtesy of Castlerock Construction.( Of course we asked before we took anything). Already had the paint, and the rope= $0!
 A $12 can of  brown paint and brushing off my art skills got us a sleeping cowboy and a fence. Did you grow up in the country?? Doesn't this totally take you back, it sure does for me.


$12 for letters from Hobby Lobby and $3 of pennies and we had his name over the crib. A buck for poster board and I added the stars.


Cowboy boots past down from  Wyatt, Brady's stuffed owl, and some keep sakes from his namesakes
gave just enough nostalgia to make this momma happy.


I wanted Mac to have something from Grandma and Grandpa Lobstein for his nursery and as a keepsake. They sent Grandpa's Sheriff Badge ! What a special and memorable gift.  I know he will cherish this gift and his family name.


 Stay tuned for a break down and instructions for each project. Comment to tell me which
  one to start with.

Tuesday, September 17, 2013

Upcycling is my middle name.

I found these adorable roughed up school desks on craigslist. The hubs saw them for what they were... I saw them for what they could be! 
First step was sanding. I have heard horror stories about sanding but I actually don't really mind it and I don't really do a good job at it either; since I was painting not staining, it didn't matter.  Just roughed it up a bit so the paint would stick. The only thing I know about sanding is go WITH the grain of the wood, so do that.  Once I sanded the top, poorly as you can tell, I liked the old, beat up, worn out look so much I decided to keep it.

Secondly, I painted three coats of both the white and the blue with a foam brush. I like foam better vs. bristle  because it doesn't leave as many brush strokes in the paint.

Once it was dry I measured the contact paper, simply by using regular printer paper taped together( to make it long enough to cover the area) and held it up to the piece to be covered and pressing/ folding the paper to leave the outline. I cut out the paper and used it as a template on the contact paper. Then it was just a matter of applying the contact paper and decals for the name-- as my 5 year old would say "easy, peasy, lemon squeezy".


With some paint leftover from another upcycle, cutesy alphabet decals and chevron contact paper from Amazon.com ( craigslist+upcycle+amazon = my heart is racing!) this little school desk looks pretty chipper if you ask me, even the hubs agrees --or maybe he is just happy to have his garage back....:)